This is How I did: Eclipse, PHP and DB2 on Windows Platform
After working in Microsoft .Net technologies for few years, I made up my mind to explore PHP world. In fact, this site is hosted using Drupal framework which is in PHP and I did not know anything about PHP to make this site working.
I am a newbie in PHP so I am documenting what I did to get myself started in PHP. Of course, my choice of database is DB2 so this article is about DB2 after all.
1. What IDE to use:
Which IDE I should use? This is the first question with which I struggled since I did not want to use notepad or vi. After doing some research I narrowed my choice to Eclipse since 1. It is free and open source and 2. It is comparable to or better than Microsoft Visual Studio. For people like me who only knew about Microsoft technologies, getting into Eclipse band wagon was an eye opener. I realized how powerful Eclipse was compared to the Microsoft Visual Studio.
Download latest version of Eclipse from http://www.eclipse.org/downloads/ .
At the time of this writing, 3.2.1 was the latest version.
I unzipped the contents into C:\Eclipse and made my workspace as C:\EclipseWorkSpace instead of the default which was buried some where under Documents and Settings.
Eclipse provides the basic foundation for IDE and one of the main reason to go Eclipse route was the availability of a PHP IDE within Eclipse framework called PHP Development Tools (PDT). You can look for PDT at http://www.eclipse.org/php/ . This is still in the development and later on some stable release will be available. I used 0.7 release at the time of this writing.
You can either download the plug-in directly from the above link or use Eclipse IDE to get it automatically. I choose the second approach as I feel that it is elegant and I do not have to install the plug-in myself. Before we download the PDT plug-in, we have to also install other plug-ins that are necessary for the PDT plug-in to work.
Launch Eclipse and go to [Help>Software Updates>Find and Install…]
Choose [Search for new features to Install] and click [Next]
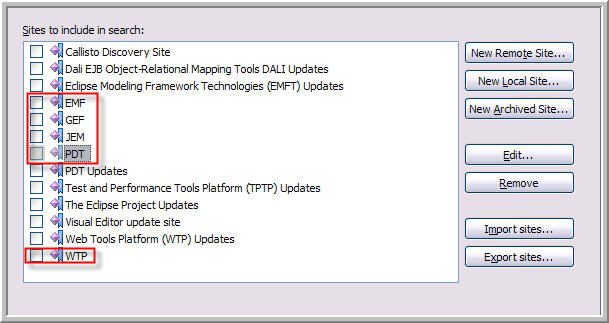
Click on [New Remote Site…] button and create following 5 new remote update site link and install the plug-ins in the following order.
- Graphical Editing Framework (GEF)
UPDATE URL: http://download.eclipse.org/tools/gef/update-site/releases/ - Eclipse Modeling Framework (EMF)
UPDATE URL: http://download.eclipse.org/tools/emf/updates/ - Java EMF Model (JEM)—from the Visual Editor Project (VEP)
UPDATE URL: http://download.eclipse.org/tools/ve/updates/1.0/ - Web Tools Platform (WTP)
UPDATE URL: http://download.eclipse.org/webtools/updates/ - PHP Development Tool (PDT)
UPDATE URL: http://download.eclipse.org/tools/php/updates/
2. Install PHP:
Go to PHP http://www.php.net/downloads.php and download the latest PHP Windows Installer (.msi file). At the time of writing this, 5.2.0 was the latest version.
Install PHP using the the install file. Install it in C:\PHP folder instead of the C:\Program Files\PHP. I chose web server as IIS 4+ ISAPI Module and IBM_DB2 extension. You should resist the temptation of choosing all extensions as some of them may give hard time to you. For example, I ran into DDL hell problem with libeai32.dll. I had to uninstall other PHP extensions since my system had many libeai32.dll and I did not know how to solve this issue. Save your MSI file and use it any time you need to install / uninstall any PHP extension. After installing PHP, take time to read C:\PHP\readme.txt file carefully. I did read this carefully and I had to do following steps to make it working.
3. Configure IIS:
Launch Start>Run>inetmgr and right click on [Default Web Site] and click on properties.
Go to [Home Directory] tab.
Choose [Script Only] option from Execute Permissions drop down.
Click [Configuration…] button. Choose C:\PHP\php5isapi.dll and associate it with .php extension as shown below.
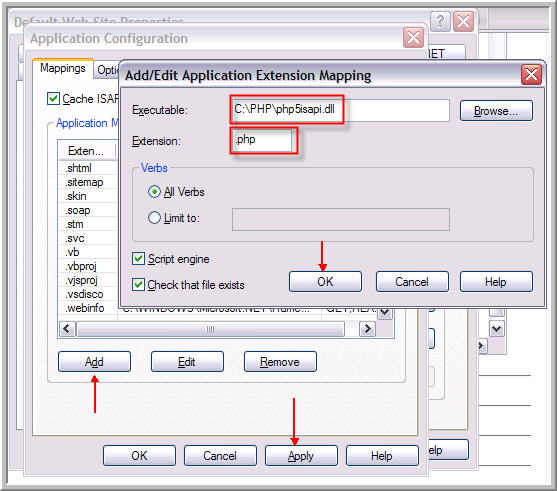
[Note: It is not necessary that you have to associate .php with php5isapi.dll. You can use any extension and not let guess your users if you are using PHP.]
By doing the above step, you have enabled ISAPI filter for .PHP files so that IIS can process them. You could have taken different route for using PHP as CGI but that is not elegant.
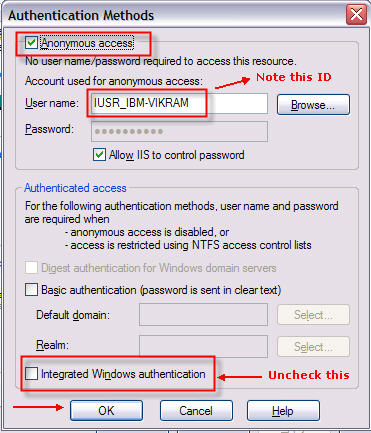
You are not done yet, go to the [Directory Security] tab and click on [Edit…] button for enabling the anonymous access. Note the ID for anonymous access and this may start with IUSR_. (Internet User) You will require this ID to grant security access for PHP, folder DB2USER group and to your website. Make sure that you uncheck integrated windows authentication check-box.
4. Create a PHP Project using Eclipse IDE:
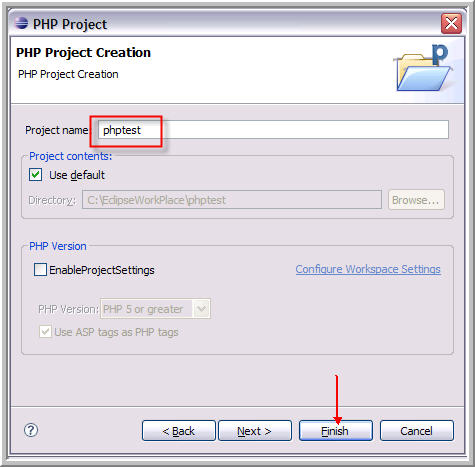
Start your Eclipse and click on File>New>Project and select [PHP Project] and click [Next].
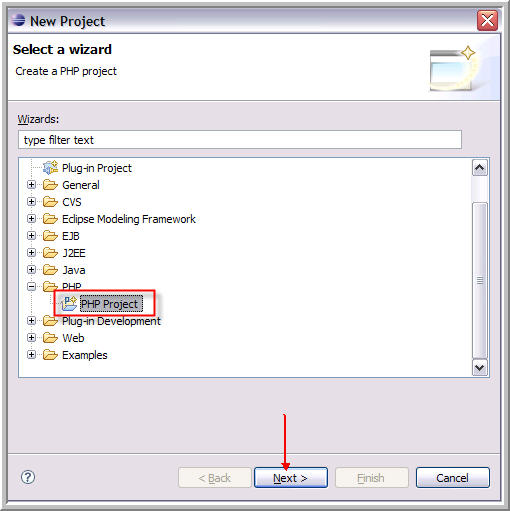
Type phptest in the next screen and click on [Finish]. By doing so, you created a PHP project in C:\EclipseWorkSpace and we will come back to this later on to create our first PHP page after few more steps.
5. Grant Security:
For PHP to work properly for your website and IIS, you need to do the following.
Go to the Windows Explorer and right click on C:\PHP and click on [Sharing and Security…] tab and add internet guest user ID (starting with IUSR_) that you noted in the previous step. Grant [Read & Execute] access on C:\PHP folder.
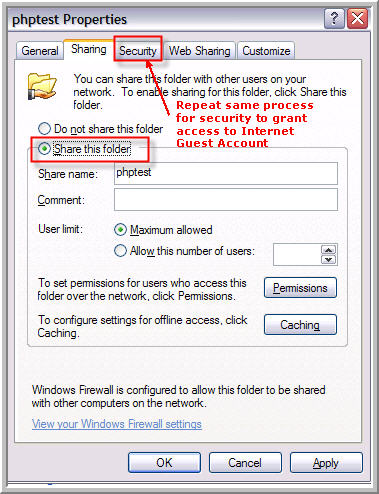
In the previous step, you created a PHP project using Eclipse at C:\EclipseWorkSpace\phptest. Right click on phptest folder and click on [Sharing and Security…] and go to the [Sharing] tab and check the radio button [Share this folder]. Click on [Security] tab and add internet guest user (starting with IUSR_) with [Read & Execute] privileges to the C:\EclipseWorkSpace\phptest folder. By doing so, you are making sure that IIS can access this folder.
6. Default index.php:
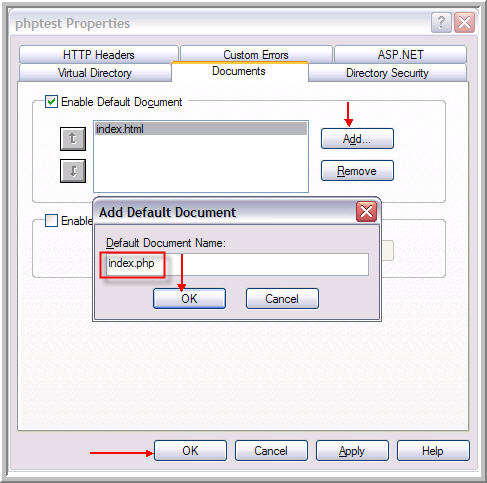
If you want to load index.php by default for your web site, you have to do one more thing before you can test a PHP page. Go to Start>Run>inetmgr and click on the [Default Web Site] and locate phptest folder underneath this. Right click on phptest and click on the [Properties]. Go to the [Documents] tab and add index.php and move it to the top.
7. Make Changes to PHP.INI:
Before you make your first PHP page, make these changes to C:\PHP\php.ini file so that PHP works correctly with IIS. Modify values for the extension_dir, display_errors and display_startup_errors as shown below:
extension_dir = C:\PHP\ext
display_errors = On
display_startup_errors = On
If you keep display_errors = Off, you will get a blank page on any PHP error. Setting this variable to On is OK in the development environment but not a good idea for your production site.
In your php.ini file, you should also see the following entry for the IBM_DB2 connector.
[PHP_IBM_DB2]
extension=php_ibm_db2.dll
If you do not, go back to your PHP installation program and add IBM_DB2 extension. You should see C:\PHP\ext\php_ibm_db2.dll file.
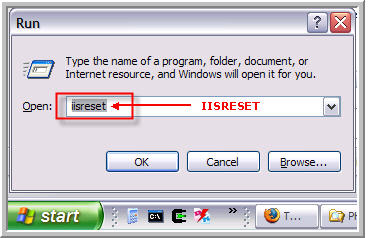
After making changes to the php.ini and after you add any extension module (PECL), you will need to restart IIS. Go to Start>Run>iisreset
8. Create your first PHP page:
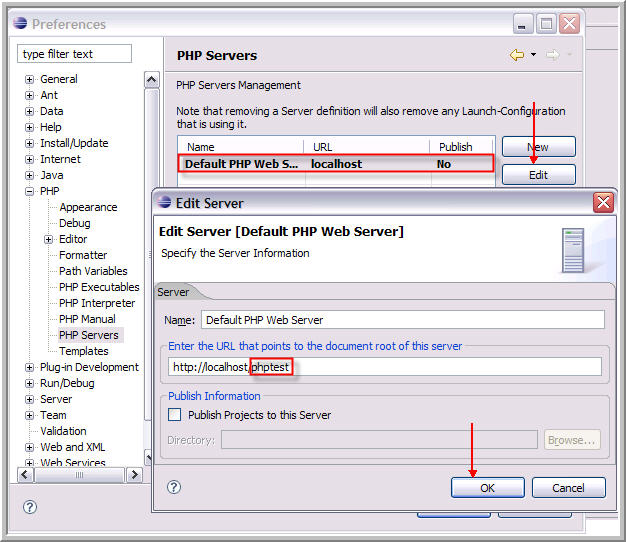
Go back to Eclipse and click on Windows>Preferences. Expand PHP and click on [PHP Servers] and modify the localhost setting to http://localhost/phptest as shown below:
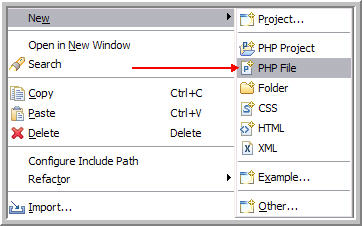
Go to the PHP Explorer perspective and right click on phptest project and click New>PHP file.
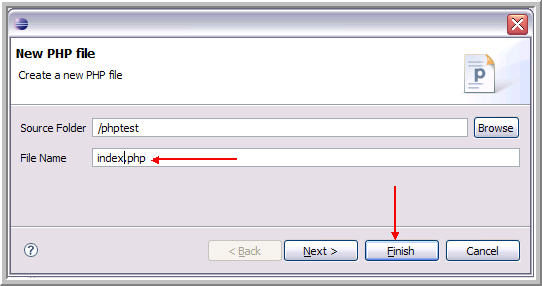
Write index.php and click on [Finish].
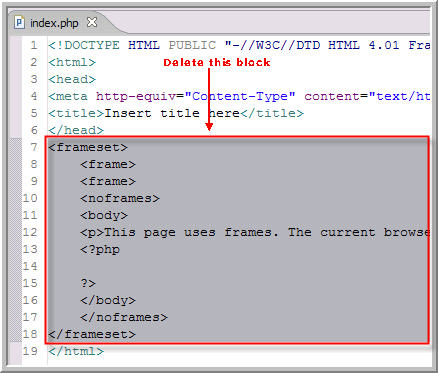
Delete the frameset block as shown below.
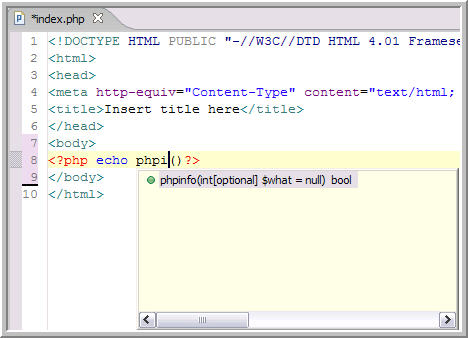
Add this code block and save the file. You will see powerful features of an IDE similar to Microsoft Visual Studio.
<body>
<?php echo phpinfo(); ?>
</body>
8. Now run your first PHP page:
Right click on index.php and select [Run As>PHP Web Page] and you should see your first PHP web page in your IDE. You can also press F5 if you are in the web page to reload the page.

Alternatively, you can launch the same page from IE or FireFox by using url http://localhost/phptest
8. Install DB2:
Before we test PHP with DB2, we need to make sure that PHP is working properly with IIS and we can see our first PHP page. So far so good. If you have DB2 installed on your machine, you can skip this step.
If you do not have DB2 installed on your machine, download free license version of DB2 9 Express-C. The DB2 9 Express-C is not a free software but you are granted a free license to use and distribute it freely with your application. It does not have a limit on the database size like other commercial databases but you can use up to 4 GB of memory for the database. Pretty darn good compared to Oracle and SQL Server limit of 1GB – isn’t it. DB2 Express-C runs on dual core processor without any limitations.
The DB2 install is a very simple process and assume all default values and install it after you download it from http://www-306.ibm.com/software/data/db2/express/
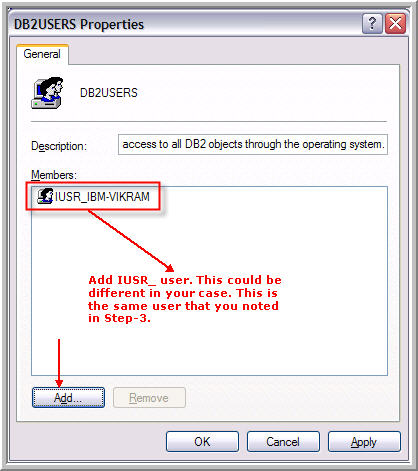
9. Changes to DB2USER Group:
We need to add internet guest user to the DB2USER group. Go to the Windows Explorer and right click on [My Computer] and click on [Manage]. Go to [Local Users and Groups] and select [Groups]. Locate DB2USERS group in the right hand side pane and double click on it. Add internet guest user (starting with IUSR_) ID that you noted in Step-3 during configuring IIS as shown below.
10. Test IBM_DB2 Connector:
Go back to the Eclipse phptest project and modify index.php file as shown below to make a connection to DB2 from index.php web page.
<?php
$db_name = 'SAMPLE';
$usr_name = 'db2inst1';
$password = '123456';
// For persistent connection change db2_connect to db2_pconnect
$conn_resource = db2_connect($db_name, $usr_name, $password);
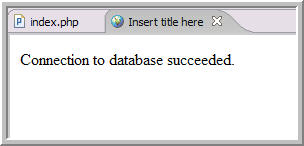
if ($conn_resource) {
echo 'Connection to database succeeded.';
db2_close($conn_resource);
} else {
echo 'Connection to database failed.';
echo 'SQLSTATE value: ' . db2_conn_error();
echo 'with Message: ' . db2_conn_errormsg();
}
?>
You should see a successful database connection page as shown below:
11. Troubleshooting IBM_DB2 Connector:
Connecting to DB2 from PHP is a simple process but things may still go wrong some where. Check following things if you were not able to connect to DB2 through your PHP web page.
- Make sure that DB2 instance is running.
- Check php.ini for extension_dir. It should point to C:\PHP\ext folder.
- Make sure that you restarted IIS after making changes to PHP.INI
- Make sure that the internet guest account access is granted to C:\PHP and C:\EclipseWorkSpace\phptest.
- Make sure that the internet guest account ID is a part of DB2USERS group.
- Make sure that you have IBM_DB2 module as a part of PHP.
C:\>php -m | findstr /i "ibm"
ibm_db2
12. Further Reading:
If you have connected successfully to DB2 from PHP, you might want to get started seriously with PHP programming. Download this free book published by IBM for PHP and DB2 and use the tutorial given in the book and enjoy your experience with PHP.
http://www.redbooks.ibm.com/abstracts/sg247218.html