The old timers DBA and System Administrators used some form of clustering to have 2 machines (One is Active and another is passive) with a shared database to provide high availability. This was traditinally done by either using IBM HACMP or Veritas Cluster Software etc.
With DB2 10.1, it is much more simpler and easier to implement by using native DB2 clustering technology what we call as Tivoli System Aumomation for Multiplatform. TSA is included with DB2 as a limited license and you can leverage that to provide a very low cost High Availability solution without having to buy a third party clustering software.
High Availability using Active / Passive
This is explained in detail here how to do this in a step-by-step guide.
- Talk to your SAN Administrator to carve out shared disk that is visible to 2 hosts. If you do not have any SAN, you can use low cost SAN solution using iscsitarget and please refer to my ealier article on how to do a low cost SAN for the purpose.
- We will use low cost solution and you can use this first to practice as a DBA to implement this successfully and once you have the confidence, then go to an actual SAN solution.
- In our example, I use a 3 VM setup on my laptop to practice this. I am going to use HADRNode01 as my SAN storage and will use HADRNode02 and HADRNode03 as Active/Passive configuration and having the shared database on my SAN node (i.e. HADRNode01).
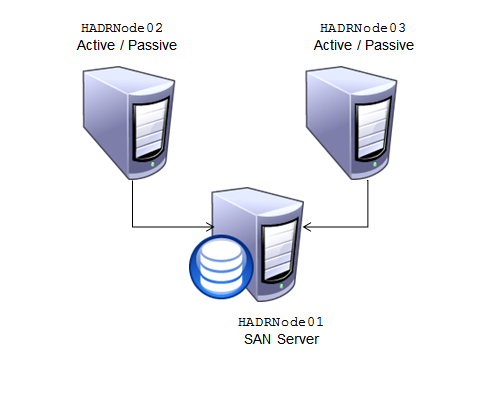
Topology for the Active / Passive
__1. We will use Active / Passive configuration using a shared DB2 database between two hosts.
__2. We will use HADRNode01 virtual machine as a SAN server hosting HADB database.
__3. We will use HADRNode02 and HADRNode03 as an Active / Passive DB2 pair with a shared database HADB residing on a SAN server HADRNode01.
Explore SAN on HADRNode01
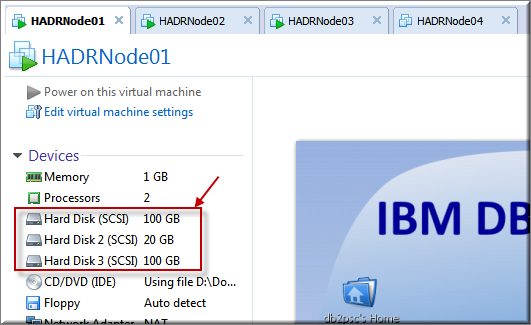
__4. Click HADRNode01 virtual machine.

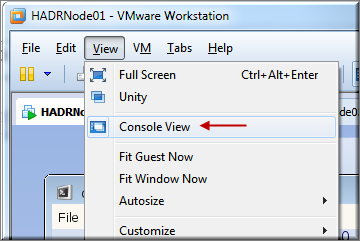
__5. Click View > Console View.
__6. Notice 3 hard disks used by the HADRNode01 virtual machine.
__7. Click anywhere in the Virtual Machine to hide the console view.
__8. Type lsscsi command in the db2psc Console window.
$ lsscsi
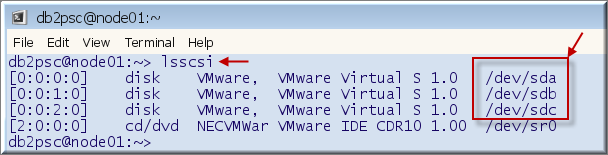
__9. Notice 3 disks used by the HADRNode01.
__10. Type sudo /sbin/fdisk -l to see the partition details of the disks. [Scroll-up to see the details.]
$ sudo /sbin/fdisk -l
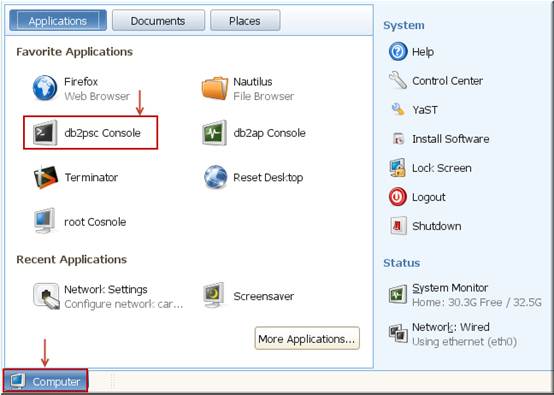
__11. Click HADRNode02 virtual machine.
![]()
__12. Click Computer > db2psc Console.
__13. Type lsscsi command in the db2psc Console window.
$ lsscsi
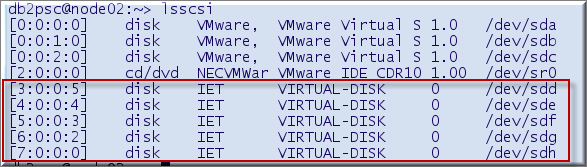
__14. Please notice that there are 5 additional IET type disks whereas this HADRNode02 machine has only three disks configured.
__15. These additional 5 disks are actually shared disks from HADRNode01.
|
|
Note: We used iscsitarget to expose 3rd partition of /dev/sda and four partitions of /dev/sdc from HADRNode01. We then use iscsiclient on HADRNode02 and HADRNode03 to actually share the disks from HADRNode01. This is a simple way to simulate SAN in absence of an enterprise SAN server. |
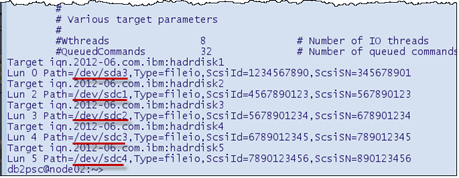
__16. Type ssh node01 sudo cat /etc/ietd.conf
$ ssh node01 sudo cat /etc/ietd.conf

__17. The configuration file on node01 is used by iscsitarget to share the local partitions as external disks. We will create DB2 database using these shared disks on node02 and node03.
Prepare HADRNode02 for the Shared Instance
__18. The HADRNode02 and HADRNode03 has local db2psc instance on each host. We will create another DB2 instance db2ap to demonstrate active / passive HA configuration.
__19. Run the following commands from HADRNode02 virtual machine.
__20. Type cd3 to change directory to 03haactivepassive.
$ cd3

__21. Run more active01 to review the script.
$ more active01 [Press space bar to continue.]

__22. Run script sudo ./active01 to stop the db2psc instance on node02 and node03.
$ sudo ./active01

__23. Type more active02 to review the script to format these disks.
$ more active02 [Press space bar to continue.]
![]()
__24. Type sudo ./active02 to format all 5 disks.
$ sudo ./active02 (Please wait for this to complete as it will take few minutes.)

__25. Type ls –ld /db2home and this is an empty directory which will be used as a mount point.
$ ls –ld /db2home
![]()
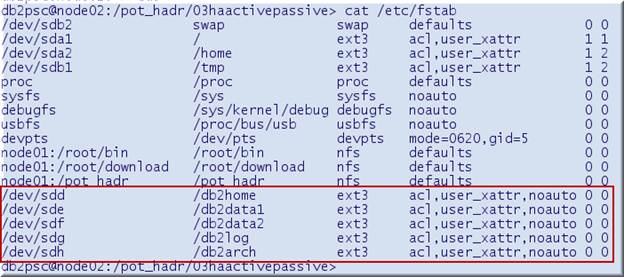
__26. Type sudo cat /etc/fstab to see the mount points for the shared disks.
$ sudo cat /etc/fstab
__27. Type mount sudo /db2home to mount the /dev/sdd on /db2home.
$ sudo mount /db2home
![]()
__28. Type ls –l /db2home.
$ ls –l /db2home

__29. Type more active03 to review the script to create db2ap instance using home as /db2home.
$ more active03
![]()
__30. Run sudo ./active03 to create DB2 instance db2ap using /db2home directory.
$ sudo ./active03
![]()
__31. The db2 instance db2ap creation process starts. Please wait for this to complete.
__32. Run sudo umount /db2home to unmount the /db2home file system.
$ sudo umount /db2home
![]()
Prepare HADRNode03 for the Shared Instance
__33. It is important to unmount /db2home from HADRNode02 first before we mount it on HADRNode03. (We already did this in the previous section.)
__34. We will now mount /db2home on HADRNode03.
__35. Click HADRNode03 to go to this Virtual Machine.
![]()
__36. Click Computer _ db2psc Console.
__37. Run command sudo mount /db2home to mount the /dev/sdc disk.
$ sudo mount /db2home
__38. Type ls -l /db2home. Notice sqllib directory which was created from the HADRNode02.
$ ls -l /db2home

__39. Type cd3 to change the directory.
$ cd3
__40. Type more active04 and review it. This script will delete sqllib directory and create db2ap instance on HADRNode03 using the shared disk from HADRNode01.
$ more active04
![]()
__41. Type sudo ./active04 to run the script.
$ sudo ./active04
![]()
|
|
Note: We have to create the instance again on HADRNode03 since some of the instance files are created on the local disk such as DB2 registry etc. The sqllib directory will be created again on the /db2home but it will have entry for the node03 in the db2nodes.cfg file instead of node02. When we configure active / passive high availability, the db2nodes.cfg file will be updated automatically depending upon the active server. |
Create HADB Shared Database
__42. We will use HADRNode03 to do this section exercises.
__43. Click Computer _ db2ap Console.
__44. The db2ap instance console has a light yellow background color to distinguish it from the db2psc command window. [Please remember this.]
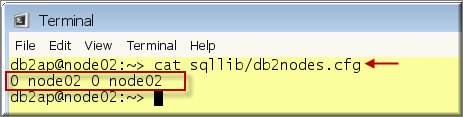
__45. Type cat sqllib/db2nodes.cfg to see the contents.
$ cat sqllib/db2nodes.cfg

__46. Type cd3 to change the directory to 03haactivepassive.
$ cd3

__47. Run active05 to mount /db2data1, /db2data2, /db2log, and /db2arch
$ ./active05
![]()
__48. Type db2start to start the db2ap instance.
$ db2start

__49. Type more active06 to review the script which will create HADB database.
$ more active06 [Press space bar to continue.]
![]()
__50. Run script active06 to create HADB database by using /db2data1, and /db2data2 storage paths.
$ ./active06

__51. Now, we will configure HADRNode02 and HADRNode03 in an Active / Passive high availability configuration in the next section.
Configure Active / Passive High Availability
__52. Recap: At this time, HADRNode03 is an active DB2 host which is having HADB database on the SAN server at HADRNode01.
__53. We will configure Active / Passive for HADRNode03 and HADRNode02.
__54. Type cd to go to the home directory.
$ cd
![]()
__55. Type sudo preprpnode node02 node03 in the db2ap console from the host HADRNode03.
$ sudo preprpnode node02 node03
![]()
__56. Go to the HADRNode02 virtual machine.
![]()
__57. Type sudo preprpnode node02 node03 from the existing db2psc Console window.
$ sudo preprpnode node02 node03
![]()
__58. Go back to the HADRNode03.
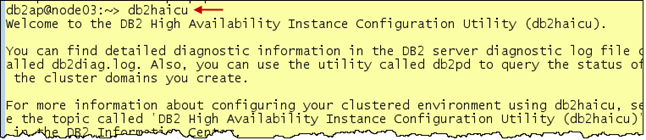
__59. Type db2haicu command from the db2ap console.
$ db2haicu
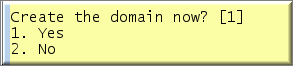
__60. Hit Enter to create a domain.

__61. Type domain name as db2ha and hit Enter.
![]()
__62. Type 2 and hit Enter. [Number of nodes in a domain.]
![]()
__63. Enter node name node03 and hit Enter.
![]()
__64. Enter node name node02 and hit Enter.
![]()
__65. Hit Enter to create the domain.
__66. Wait for the new domain to create.

__67. Hit Enter to configure a quorum device for the domain.

__68. Hit Enter to accept network quorum.

__69. Type gateway IP address 192.168.142.2 and hit Enter. [No mistake and typos please.]

__70. Wait for the network device to be configured.
__71. Hit Enter to create network for the interface cards.

__72. Type 2 and hit Enter to add eth0 of node03.

__73. Hit Enter to confirm.

__74. Type 1 and hit Enter to add eth0 of node02.
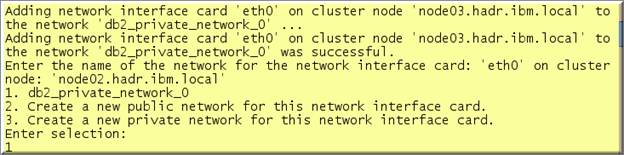
__75. Hit Enter to add eth0 of node02 again.

__76. Type 1 and hit Enter to add eth0 of node03.
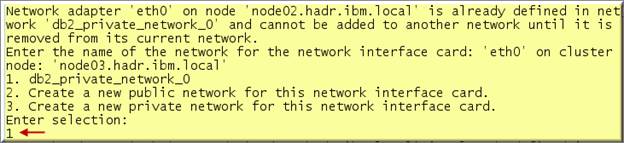
__77. Type 1 and hit Enter to add eth0 of node02.

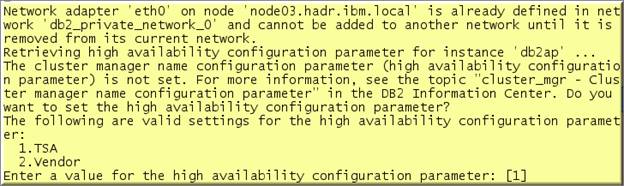
__78. Hit Enter to accept TSA to be used as a high availability configuration parameter for the db2ap instance.
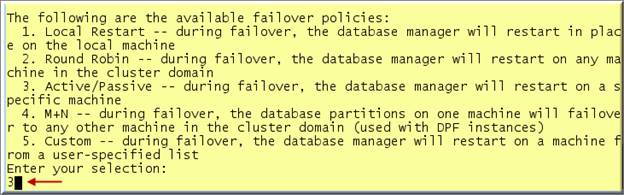
__79. Enter 3 for the Active/Passive failover policy and hit Enter.
__80. Hit Enter to accept non-critical mount points.

__81. Type node03 as active host and hit Enter.

__82. Type node02 as passive host and hit enter.
![]()
__83. The database will be added to the cluster.
![]()
__84. Type 1 and hit Enter for virtual IP address for active / passive pair.

__85. Type 192.168.142.100 and hit Enter.
![]()
__86. Type 255.255.0.0 and hit Enter for the subnet mask.
![]()
__87. Type 1 and hit Enter.

__88. Hit Enter to continue to add HADB database to be made as highly available. (Please wait for this to complete.)

__89. The HA configuration is now complete with the following message.

Explore DB2 High Availability Infrastructure
__90. Type lsrpdomain to see the db2ha peer domain that was created by the RSCT when we ran db2haicu command in the previous section.
$ lsrpdomain

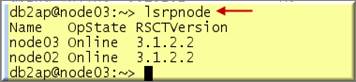
__91. Type lsrpnode to see that our db2ha peer domain has node02 and node03 hosts.
$ lsrpnode
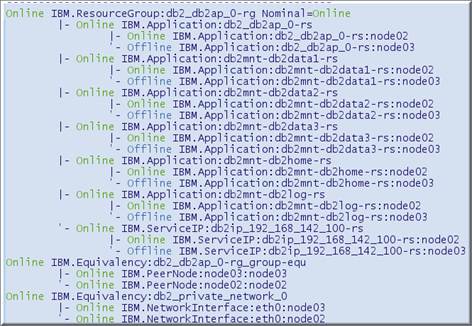
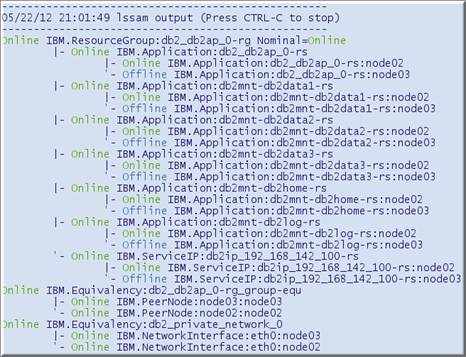
__92. Type lssam to see the RSCT resources created after we ran the db2haicu command.
$ lssam
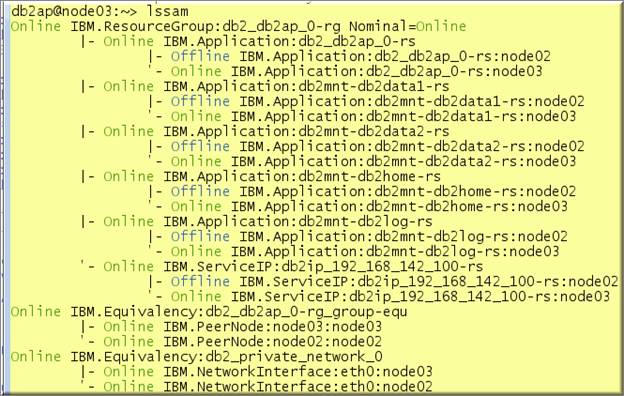
__93. Please notice that a resource group db2_db2ap_0-rg was created and it is online. The IBM.Application resource db2_db2ap_0-rs belongs to this resource group.
__94. Type lsrsrc –Ab IBM.ResourceGroup to see the details of this group.
$ lsrsrc –Ab IBM.ResourceGroup

__95. Type lsrsrc –Ab IBM.Application to see the details of the resource db2_db2ap_0-rs.
$ lsrsrc –Ab IBM.Application
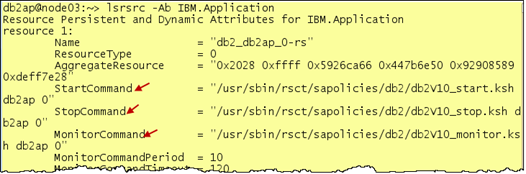
__96. Notice the start, stop and monitor commands that RSCT uses to manage DB2 in case of a failure.
|
|
Note: We can implement any type of HA configuration by using low level RSCT and Tivoli commands. The db2haicu command makes it easier to implement HA without having to know low level commands. |
__97. Type lsrsrc –Ab IBM.PeerNode.
$ lsrsrc –Ab IBM.PeerNode

__98. Go to the HADRNode02 and type lsrsrc –Ab IBM.PeerNode.
$ lsrsrc –Ab IBM.PeerNode
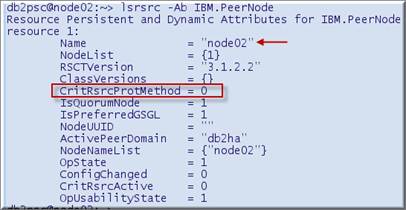
__99. Notice that CritRsrcProtMethod is set to 0 which means that if RSCT is not able to start the critical resource, it will reboot the machine or if the machine is powered down through operating system, it will override and instead reboot the machine.
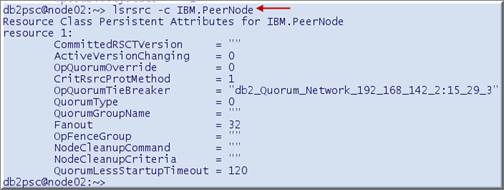
__100. Type lsrsrc –c IBM.PeerNode and notice the name of the active tie-breaker used for the peer domain.
$ lsrsrc –c IBM.PeerNode
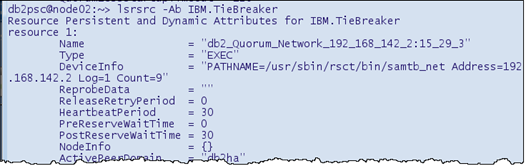
__101. Type lsrsrc –Ab IBM.TieBreaker to see the details of the tie-breaker particularly the one shown above.
$ lsrsrc –Ab IBM.TieBreaker
__102. Type lscomg –i CG1 to see the about the network monitored through RSCT.
$ lscomg –i CG1

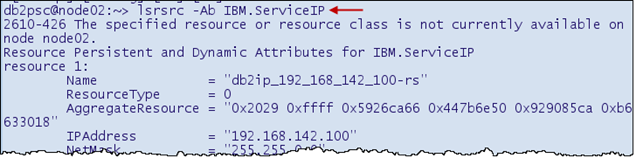
__103. Type lsrsrc -Ab IBM.ServiceIP to know the details about the virtual IP addtress.
$ lsrsrc -Ab IBM.ServiceIP
Test DB2 High Availability Features
__104. We will work from the HADRNode02 which is now passive. We will power-off HADRNode03, which is active. The automatic failover will happen to the HADRNode02 which will become active. We will then power-on HADRNode03.
__105. Click HADRNode02.

__106. From the db2psc Console window, type cd3 to make sure that you are in 03haactivepassive.
$ cd3

__107. Run ./active07 to watch lssam output.
$ ./active07
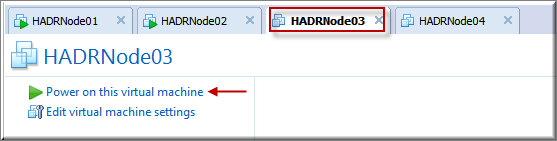
__108. Click HADRNode03 Virtual Machine to select it and power off as shown below.
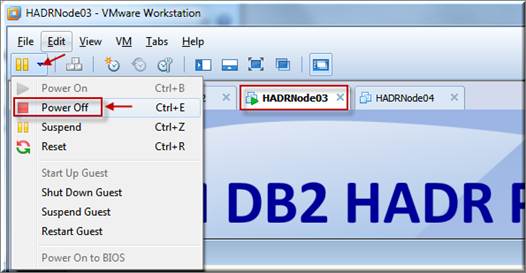
__109. Click Power off.
__110. Click HADRNode02 virtual machine to select it and watch for the lssam output. [Adjust height of the window to see the full lssam output.]
__111. After few seconds, the output from lssam starts to show again and node02 becomes active. The directories are mounted automatically. Press CTRL-C to break the lssam output.
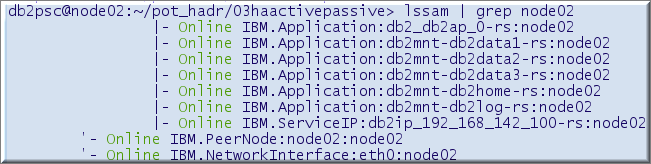
__112. Type lssam | grep node02 to check if all resources are online for node02, which is the active host now.
$ lssam | grep node02
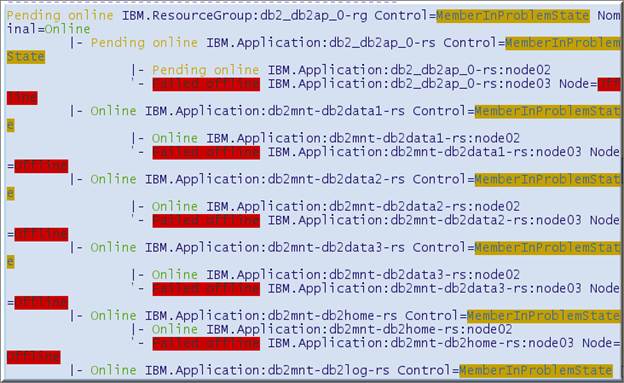
__113. Type lssam | grep node03 and notice that all resources show failed offline since the node03 machine is down.
$ lssam | grep node03

__114. Click HADRNode03 Virtual Machine and power it on as shown below.
__115. Return to the HADRNode02 and run active07 script again.
$ ./active07
__116. After node03 is alive, the resources will become online.
__117. Please wait for all resources to show online. Press CTRL-C to stop the script when resources show Online.
__118. Since node02 is active node now, click db2ap Console.

__119. Type cat sqllib/db2nodes.cfg. Notice that RSCT made changes to this file automatically.
$ cat sqllib/db2nodes.cfg
__120. Type cd3 to change the directory to Lab 03..
$ cd3
3.9 Test Local Restart
__121. From HADRNode02 virtual machine, click Computer _ db2psc Console to open another window.
__122. Type cd3 to change the directory.
$ cd3
__123. Arrange both windows side by side. Please keep db2psc window having light sky blue background at the left and the db2ap instance window with light yellow background at the right.

__124. Type active07 to monitor the lssam output.
$ ./active07 [From the left window]
__125. Adjust the height of the top window so that you could see the full output.
__126. Type db2_kill from the right window having light yellow background color.
$ db2_kill [From the right window]
__127. Notice in the left window that the db2 resource group db2_db2ap_0-rg goes offline and RSCT brings it online again. This is an example of local restart of DB2 instead of failover triggering passive host to become active.
Switch Role of Active / Passive Nodes
__128. Type su – and specify password as password.
$ su – [From the right window]

__129. You can switch the role of Active / Passive through RSCT rgreq command.
__130. Type rgreq –o move db2_db2ap_0-rg to move the db2 resource group from one host to the another.
# rgreq –o move db2_db2ap_0-rg

__131. Please watch the lssam output from the left window and notice how floating resources are moved from one host to another. It may take 2-3 minute for the DB2 to shutdown, unmount shared directories, move floating resources like mount points, IP address to another host.
__132. By moving the floating resources from one machine to another, you can perform the maintenance.
__133. Please wait for resources to show online.
__134. Press CTRL-C in the left window to close the lssam monitoring when all resources are online.
Test Applications in Active / Passive
__135. In the previous section, we made HADRNode03 as the active node. Use lssam output to confirm which host is the active host. Type lssam | grep db2ap.
$ lssam | grep db2ap

__136. Go to the HADRNode03 node to create test tables for the Java program in HADB database.
![]()
__137. Close all open command windows, if any.
__138. Click Computer _ db2ap Console.
__139. Type cd3 to change the directory to 03haactivepassive.
$ cd3

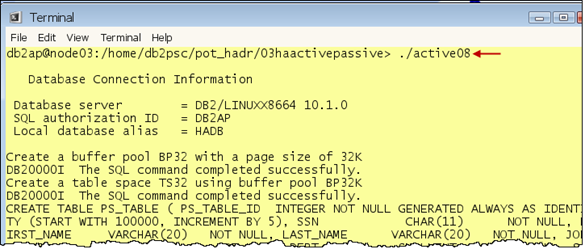
__140. Type ./active08 to create test tables in HADB database.
$ ./active08
__141. Go to the HADRNode01 node as we will run Java application program from this node.
![]()
__142. Close all open command windows, if any.
__143. Click Computer _ db2psc Console.
__144. Type cd3 to change the directory to 03haactivepassive.
$ cd3

__145. Click Computer _ db2psc Console.
__146. Type cd3 to change the directory to 03haactivepassive.
$ cd3
__147. Stack both windows side by side.
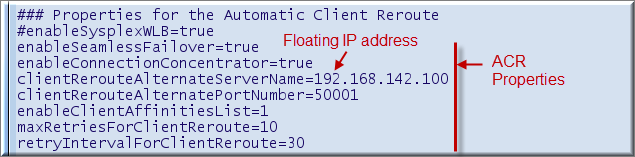
__148. Type more active11.properties to review the Automatic Client Reroute properties.
$ more active11.properties (From the left window)
__149. Type ping –c4 192.168.142.100 which is the floating IP address for either Active / Passive.
$ ping –c4 192.168.142.100 (From the left window)

__150. Run ./active10 which uses above properties file.
$ ./active10 (From the left window)
__151. While the above script is running, run sudo ./active12 which will move the floating resources from the Active to the Passive machine and thus triggering a switch-over of the role.
$ sudo ./active12 (From the right window)
__152. The application will wait (Actually it is the JDBC driver based upon ACR properties) until Active host becomes available again.
__153. Type ssh node02 lssam | grep db2ap to chech which node is active now.
$ ssh node02 lssam | grep db2ap

__154. Press CTRL-C to stop the application from the left window.
Mount Points in Active / Passive
__155. Go to the HADRNode02 and type lssam | grep mnt.
$ lssam | grep mnt
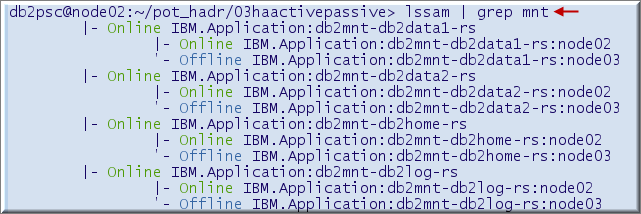
__156. Notice that there are mount resources defined for db2home, db2data1, db2data2, and db2log. We did not do anything separately to define these since there is a close interaction between db2 and RSCT.
__157. If we add storage path to the HADB database, the mount point will be added to the RSCT configuration automatically.
__158. However, it is important that an entry needs to be made in /etc/fstab with no mount option since RSCT will mount / unmount them automatically.
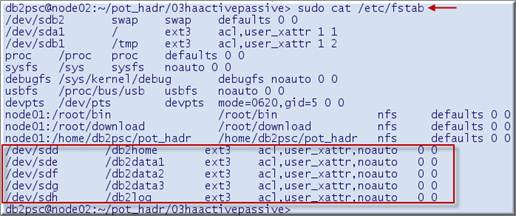
__159. Type cat /etc/fstab to see the noauto mount option.
$ cat /etc/fstab
Backup HADB
__160. We will take backup of HADB database for the purpose of the next lab to set up DR hosts for this Active / Passive configuration
__161. Type exit from the root window.
$ exit
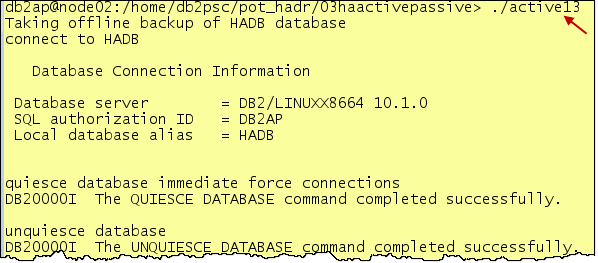
__162. Type more active13 to see the contents of the script to take the backup.
$ more active13
![]()
__163. Run ./active13 to take the backup.
$ ./active13