I am going to show you an easy way to do online schema changes in DB2. The best to learn things is by doing some simple examples. My intent is to make you an expert in 1/2 hour if you learn the following concepts.
- Create a database with and without automatic storage enabled
- Add automatic storage to a database that does not have it enabled
- Convert a DMS table space to use automatic storage that was not previously using it
- Use DB2 administration views to check for automatic storage status
- Set up your database for automatic revalidation of objects
- Use create with error (create objects that reference other objects that do not yet exist and marking them invalid)
- Revalidate invalid objects at access time
- Alter a table to change data types, change column names and to drop a column
- Show how a single alter table commands forces a table reorg if you wish to write to it
- Show how 3 alter table commands force a table reorg to be able to do more alter table commands
- Show how to use administration views to see invalid objects
Prerequisite
- Install DB2 9.7 on Windows if you do not already have it.
- Download scripts from here
- Unzip files in C:\
New automatic storage features
Adding automatic storage to a database
1. Open a Windows Command prompt
2. Change your directory to: C:\COBRA_LAB_SCRIPTS\SCHEMA
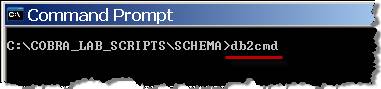
3. To open a DB2 CLP window, type: db2cmd
4. In the Windows Explorer, review command script SCHEMA01.CMD (Right click-> Edit. Do not double click!)
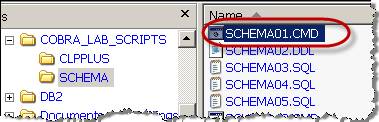
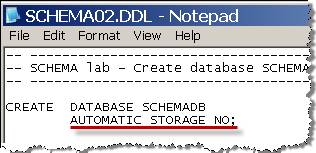
5. Notice this script calls SCHEMA02.DDL. Review this script now. Notice this creates a database called SCHEMADB without automatic storage. It also creates a DMS table space that is of course not using automatic storage either.
6. Execute script SCHEM01.CMD.
7. The script takes about 90 seconds to create the database. Wait for the script to finish before trying to run any more commands from the CLP. While this is running, review the SCHEMA03.SQL script to see how the administrative view works that we will be running when this finishes. SCHEMA03.SQL checks to see if any table spaces are using automatic storage in our database.
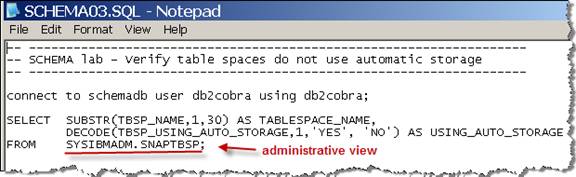
8. When the first scrip finishes, execute the SCHEMA03.SQL script this way:
db2 -td; -vf SCHEMA03.SQL
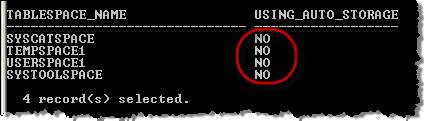
9. When it is finished, notice the state of all the table spaces in our database:
10. Another way to verify that automatic storage is not enabled in this database is to try to create a table space using automatic storage. To do this, type the following in the DB2 CLP window:
db2 create tablespace new_ts
Note: We can run the above command because the previous script connected to the schemadb database for us. Since we have stayed in our CLP window we are still connected. If you accidentally close your CLP window, you might need to connect to the database again. To do this, use command “db2 connect to schemadb”.

11. The SQL20317N error message states that automatic storage has not been defined for this database. This is what some DB2 customers encounter in real life situations when the DBA either forgot to enable automatic storage or thought they did not need it and then turned out later they did need it after all. Prior to Cobra, there was nothing you could do about this except to backup the database and do a redirected restore to a newly created database with automatic storage enabled. Painful.
12. Another way you can check to see if your database is using automatic storage by running this command that uses a DB2 administration view.
db2 select db_storage_path from sysibmadm.snapstorage_paths
13. 0 records are selected because there are no storage paths for your database. A database storage path is the path (or paths) defined when you enable automatic storage.
14. DB2 now makes it easy to enable automatic storage. Let’s do that now. From the DB2 CLP window, enable automatic storage by typing the following:
db2 alter database add storage on ‘C:’
15. Make sure you use single quotes as shown.
16. You should get a message “SQL Command Completed Successfully”. You have now enabled automatic storage for this database with one easy command!
17. To check it, issue this command again. (hint: use up arrow key twice.)
db2 select db_storage_path from sysibmadm.snapstorage_paths
18. Your query returns one storage path, which is C:
19. Now, try to create a table space using automatic storage again. (hint: use up arrow key)
db2 create tablespace new_ts
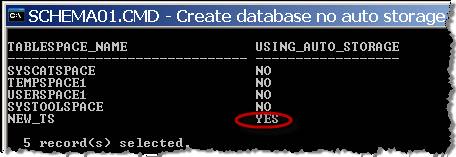
20. This command is successful because we can now use the automatic storage feature in our database. Verify this table space creation by running the script that lists the table spaces and their automatic storage usage. (Again, use up arrow key.)
db2 -td; -vf SCHEMA03.SQL
So, we verified that NEW_TS was created using automatic storage.
Adding automatic storage to a table space
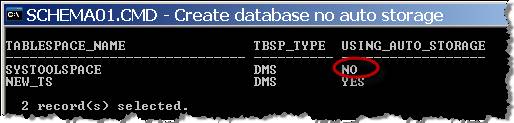
21. Now we want to see if there are any DMS table spaces that we can convert to automatic storage that are not using it. Run this SQL, which uses a DB2 administration view to see this information. (Hint: use the up arrow key to bring your last command back and change the script name.)
db2 -td; -vf SCHEMA04.SQL
22. Your output shows table space called SYSTOOLSPACE is DMS and does not use automatic storage
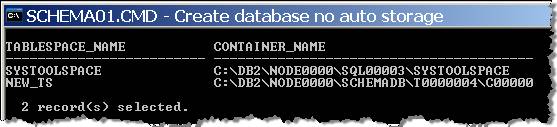
23. Let’s list the containers for these two table spaces. Use this command which will call SQL that uses another DB2 administration view.
db2 -td; -vf SCHEMA05.SQL
24. Notice that NEW_TS is using the automatic storage path and SYSTOOLSPACE is using a default DMS path.
25. We can convert table space SYSTOOLSPACE to use automatic storage with the following command:
db2 alter tablespace systoolspace managed by automatic storage
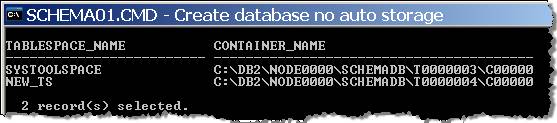
26. You have now added the automatic storage path to this table space. To see this run this command again:
db2 -td; -vf SCHEMA05.SQL
27. Notice that SYSTOOLSPACE is using both its old container and the new automatic storage container.

28. DB2 will keep this scenario and use both containers unless you force it to do otherwise. Use this command to force a rebalance:
db2 alter tablespace systoolspace rebalance
29. When the rebalance is done, check your containers again by using this script one last time:
db2 -td; -vf SCHEMA05.SQL
30. Notice now that SYSTOOLSPACE only uses the automatic container.
31. You can also check to see if SYSTOOLSPACE is using automatic storage by running this script again:
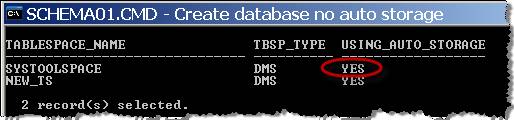
db2 -td; -vf SCHEMA04.SQL
32. Notice SYSTOOLSPACE is now using automatic storage
Automatic Object Revalidation
1. At the heart of the online schema changes capability, is a new database configuration parameter called AUTO_REVAL. In order to let DB2 defer the checking of the validation of objects, set this parameter with this command:
db2 update db cfg using auto_reval deferred_force
2. Execute this command to check if this is set (note: this is case sensitive):
db2 get db cfg | FindStr AUTO_REVAL

3. Use the Windows Explorer to review script SCHEMA10.CMD. (Right click-> Edit.) See that it calls SCHEMA11.DDL. Review SCHEMA11.DDL carefully.
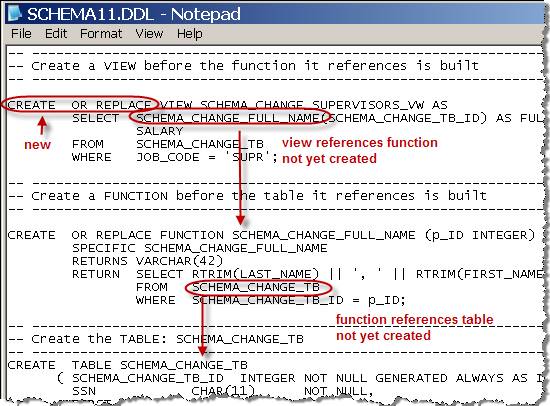
4. First, notice DB2 will perform the CREATE OR REPLACE functionality. This is an important online schema change ability. It means that we can avoid using DROP in order to recreate a view which preserves grants to the view.
5. Second, notice also that the view references a function not yet created, and then the function references a table not yet created. Won’t this DDL fail if it is attempted to be run in this order? Normally, yes, but with AUTO_REVAL set as we did earlier, it will work.
6. Run SCHEMA10.CMD by typing its name:
SCHEMA10.CMD
7. Review the output file SCHEMA10_OUTPUT.TXT. Notice that the view is created, but marked invalid. The function is also created, but marked invalid. This is referred to as create with error.
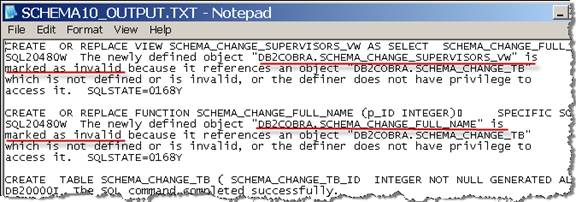
8. Keep reviewing this output file. Notice that the view and function are both auto revalidated when referenced later with the SELECT. Notice that the SELECT is from the view, which uses the function, which references the table. Everything revalidates and works just fine!

NOTE: The table, function and view created here can be deleted using script SCHEMA49.DDL. But only use this if you are playing with this feature after the lab is complete. Don’t use it now.
Altering a table and keeping it online
Multiple table alters in a script
1. Next, we will alter our table SCHEMA_CHANGE_TB to see how DB2 handles doing table alters. Review both command scripts: SCHEMA12.CMD which executes SCHEMA13.DDL. (Use right click -> Edit)
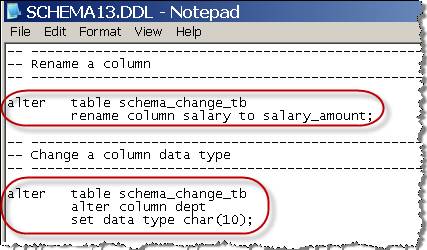

2. Notice that the column called salary will change name to salary_amount.
3. Notice that the column called dept will change from an SMALLINT to a CHAR(10)
4. Notice that column ssn is dropped.
5. Also notice the script has a REORG at the end of it. We’ll explain why later.
6. Run this script to see how the alter works:
SCHEMA12.CMD
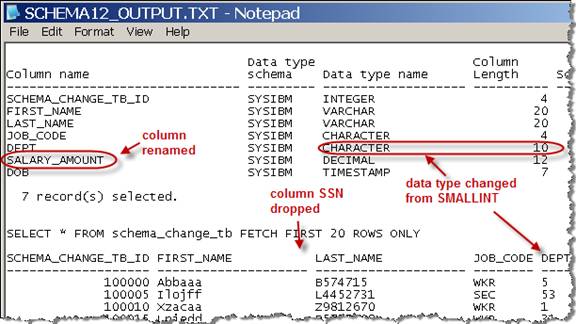
7. Review file SCHEMA12_OUTPUT.TXT. Notice the alter commands succeed and the table stays read accessible.
Alter table #1
8. So, how did this alter work? Let’s look more closely at altering column data types to understand what DB2 is doing. Use this command to do our first alter to our table:
db2 alter table schema_change_tb alter column dob set data type timestamp
9. The command is successful. What does this mean for our table? Let’s try to select from it:
db2 select * from schema_change_tb fetch first 1 rows only
10. The command is successful. What does this mean for our table? Let’s try to select from it:
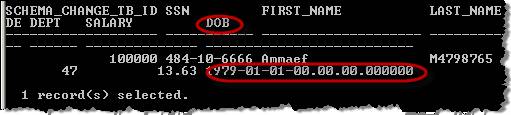
11. Notice the DATE column is now TIMESTAMP. The ALTER worked just fine and so did the SELECT after it was altered.
12. Try an update to the table. Use this command:
db2 update schema_change_tb set job_code = ‘WORKR’ where job_code=’WKR’
13. Oops. We are not allowed to do a write to the table. UPDATES and INSERTS will not work while this table is in this state. We will have to do a REORG of the table to make it write accessible. We’ll do this later in the lab.

14. Recap: We can read the table after the alter data type, but we cannot write to it.
Alter table #2
15. Now, let’s experiment with altering this table some more (hint: use your up arrow key and make changes to your previous script…)
db2 alter table schema_change_tb alter column job_code set data type integer

16. Notice, DB2 does not allow this. You have character data in the job_code column and DB2 knows it cannot be changed to integer data. If your job_code column had only ‘1’, ‘2’, ‘3’, ‘555’, etc. then this command could be done because DB2 could cast that data to an integer.
17. Now try this command (hint: use your up arrow key again…)
db2 alter table schema_change_tb alter column job_code set data type char(1)

18. DB2 does not allow this either and gives you the same error message. It knows that even though the source and target columns are both CHAR, there is data in the table that would be truncated if it reduced the column size, so it will not let you do this operation.
19. Try this command:
db2 alter table schema_change_tb alter column job_code set data type char(10)
20. This worked. This is the second successful alter command to this table in this series. Column JOB_CODE was originally data type CHAR(4), so moving this data into a larger character column CHAR(10) is OK.
Alter table #3
21. Try this command:
db2 alter table schema_change_tb alter column job_code set data type varchar(20)
22. This succeeded too.
23. DB2 can move data within compatible data types and the target data type is larger than the source, so the data fits nicely and the command is successful.
24. This is the third successful alter command in this series.
25. Try to do one more alter table command:

26. DB2 gives us a new error message: an invalid state error code. What this means is that DB2 only allows you three successful sessions of altering the same table before it requires a REORG on that table.
27. To be able to perform writes to an altered table or to be able to perform more alters on this table, use this command:
db2 reorg table schema_change_tb
28. When DB2 returns that “the reorg command completed successfully”, then you can do more alters to that table.
29. Now try this same command again (hint: use up arrow)
db2 alter table schema_change_tb alter column job_code set data type char(5)
30. The command is successful now for two reasons:
- We performed a reorg on the table, which restarts the 3 alter limit
- We are allowed to truncate the table to a smaller column size because DB2 knows that the largest data value in that column is 4 bytes (what it was originally.) Even though that column was expanded to CHAR(10) and later to VARCHAR(20), the new room we gave this column was not used. Had we inserted data of more than 5 characters after growing the column size, then we would not have room to shrink this column to CHAR(5) later.
31. Now make sure you reorg this table so you can write to it:
db2 reorg table schema_change_tb
32. Now, try writing to the table (use up arrow key to bring this command back)
db2 update schema_change_tb set job_code = ‘WORKR’ where job_code=’WKR’
33. The command succeeds because we did a reorg on the table after the alter.
Revalidating invalidated objects
34. So, how does all of this altering of our table affect other related objects? If you want to check if this has invalidated anything, use this command:
db2 select objectname from syscat.invalidobjects
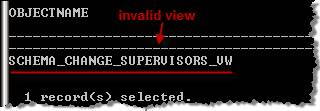
35. Notice the view that references this table has been made invalid. If you want to try to revalidate this view, simply access it:
db2 select * from schema_change_supervisors_vw

36. We have a problem. The column SALARY is referenced in our view, but we changed it earlier to SALARY_AMOUNT. Auto revalidation did not work in this case because the view definition is not able to work with the altered table as-is.
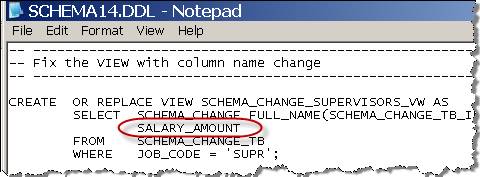
37. We will have to fix our view. Review and run script
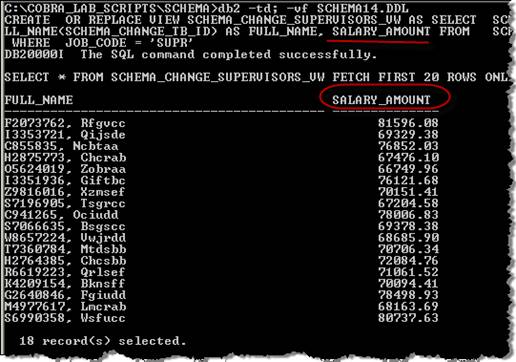
db2 -td; -vf SCHEMA14.DDL
Our view has been fixed and it runs fine.
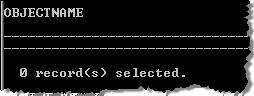
38. Now check the invalid objects catalog view again:
db2 select objectname from syscat.invalidobjects
A word about SOFT invalidation: Soft invalidation allows for you to drop an object, even when running transactions are using it. The Cobra default for soft invalidation is ON. If you wish to turn this off and require an exclusive lock on an object in order to drop it, set the following registry variable like this:
db2set DB2_DDL_SOFT_INVAL=OFF