You have installed DB2 on your database server and now you need to setup your IBM PHP client to connect to DB2. Do you require a full ~500 MB client install? Mostly, system administrator or DBAs grind their teeth when they find out that for a simple connect from PHP, they need to install a big fat client. But, things have changed and you can install a thin ODBC-CLI client instead of installing a fat client.
Pre-requisites
- IBM_DB2 PHP driver
- You have already compiled the driver either on a DB2 server or on a machine having thick client. Refer to this article for how to compile PHP driver
- or, you already got ibm_db2 PHP driver from somewhere for your version of PHP
- or, you plan to use ibm_db2 PHP driver available with thin ODBC-CLI driver.
[vikram@gopal php64]$ pwd
/home/vikram/clidriver/php64
[vikram@gopal php64]$ ls -l
total 492
-rwxr-xr-x 1 vikram vikram 174098 Oct  2 03:41 ibm_db2_4.4.6.so
-rwxr-xr-x 1 vikram vikram 179801 Oct  2 03:41 ibm_db2_5.2.1.so
-rwxr-xr-x 1 vikram vikram 132765 Oct  2 03:42 pdo_ibm_5.2.1.so
- or, if you like to build a RPM for distribution for ibm_db2 PHP driver, refer to http://www.db2ude.com/?q=node/26
- or, refer to the latest IBM DB2 documentation for step by step process.
Steps to get IBM thin ODBC-CLI Driver
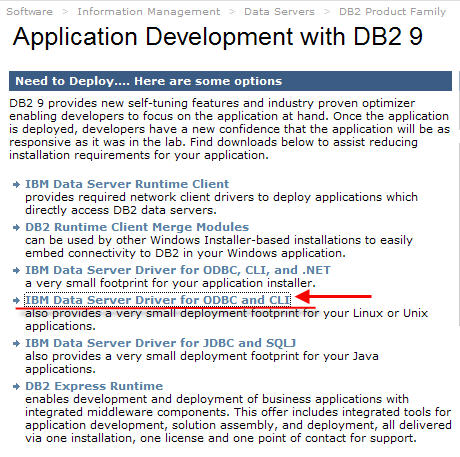
- Go to IBM DB2 Application Web Site at http://ibm.com/software/data/db2/ad
- Click on download now link
- Click on IBM Data Server Driver for ODBC and CLI link
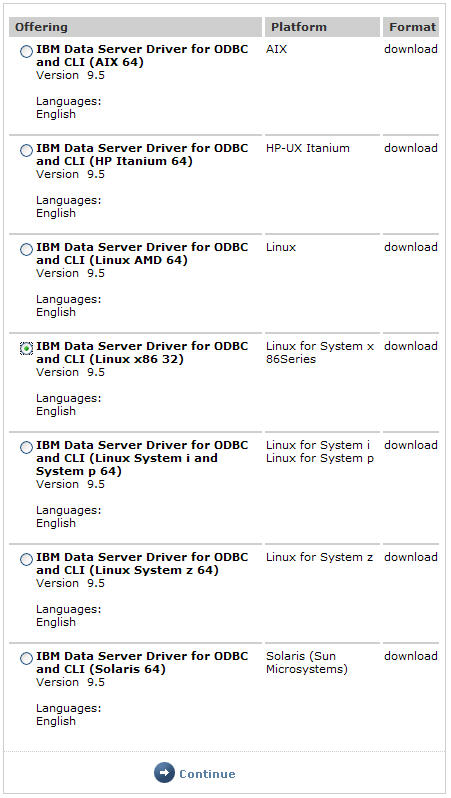
- After you click above link, you will be asked to login. If you do not have an IBM User ID, create one and save that for your future use as you will require that user ID for any download etc. Choose the right driver type and download it. You will see a download page similar to shown below:
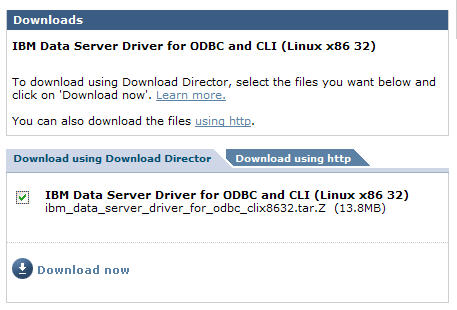
- After accepting license agreement, download the driver (approx 14MB) and you will see a screen something similar to one shown below:
- After you download the ODBC-CLI driver, you need to install it manually since there is no GUI install program. Installation is nothing but uncompressing the file to a directory somewhere on your application server.
[vikram@gopal clidriver]$ pwd
/home/vikram/clidriver
[vikram@gopal clidriver]$ ls -l
total 56
drwxr-xr-x 2 vikram vikram 4096 Oct  4 00:12 adm
drwxr-xr-x 2 vikram vikram 4096 Oct  4 00:12 bin
drwxr-xr-x 2 vikram vikram 4096 Oct  4 00:12 bnd
drwxr-xr-x 2 vikram vikram 4096 Oct  4 00:12 cfg
drwxr-xr-x 4 vikram vikram 4096 Oct  4 00:12 conv
drwxr-xr-x 2 vikram vikram 4096 Oct  4 00:12 db2dump
drwxr-xr-x 3 vikram vikram 4096 Mar 28 22:31 lib
drwxr-xr-x 3 vikram vikram 4096 Oct  4 00:12 license
drwxr-xr-x 3 vikram vikram 4096 Oct  4 00:12 msg
drwxr-xr-x 2 vikram vikram 4096 Oct  2 11:51 php32
drwxr-xr-x 2 vikram vikram 4096 Oct  4 00:12 php64
drwxr-xr-x 2 vikram vikram 4096 Oct  2 11:51 ruby32
drwxr-xr-x 2 vikram vikram 4096 Oct  4 00:12 ruby64
drwxr-xr-x 3 vikram vikram 4096 Oct  4 00:12 security64
- After you have extracted files, configure it as per this link. You might not need to do any thing but this link is here for reference purpose.
- After you have copied or installed your PHP driver, make sure that you made correct entries in your php.ini file. You can check modules directory of php to make sure that you have ibm_db2.so shared library. The modules or ext or extension directory location will be different based upon your distribution.
/usr/lib64/php/modules
[vikram@gopal modules]$ ls -l
total 2896
-rwxr-xr-x 1 root root  337448 May  9  2007 gd.so
-rwxr-xr-x 1 root root  167620 Mar 28 23:17 ibm_db2.so
-rwxr-xr-x 1 root root   46152 May  9  2007 ldap.so
-rwxr-xr-x 1 root root 1863856 May  9  2007 mbstring.so
-rwxr-xr-x 1 root root  118952 May  9  2007 mysqli.so
-rwxr-xr-x 1 root root   54088 May  9  2007 mysql.so
-rwxr-xr-x 1 root root   28296 May  9  2007 pdo_mysql.so
-rwxr-xr-x 1 root root   92616 May  9  2007 pdo.so
-rwxr-xr-x 1 root root   24520 May  9  2007 pdo_sqlite.so
-rwxr-xr-x 1 root root   15416 Nov  6  2006 phpcups.so
Now, you should see the dependencies involved for successful execution of your ibm_db2.so shared library.
[vikram@gopal modules]$ ldd ibm_db2.so
        libdb2.so.1 => /home/db2/sqllib/lib64/libdb2.so.1 (0x00002aaaaabbe000)
        libc.so.6 => /lib64/libc.so.6 (0x00002aaaacbda000)
        libcrypt.so.1 => /lib64/libcrypt.so.1 (0x00002aaaace23000)
        libdl.so.2 => /lib64/libdl.so.2 (0x00002aaaacf57000)
        libpthread.so.0 => /lib64/libpthread.so.0 (0x00002aaaad05c000)
        libm.so.6 => /lib64/libm.so.6 (0x00002aaaad174000)
        libdb2dascmn.so.1 => /opt/ibm/db2/V9.5/lib64/libdb2dascmn.so.1 (0x00002aaaad2f5000)
        libdb2g11n.so.1 => /opt/ibm/db2/V9.5/lib64/libdb2g11n.so.1 (0x00002aaaad522000)
        libdb2genreg.so.1 => /opt/ibm/db2/V9.5/lib64/libdb2genreg.so.1 (0x00002aaaadda6000)
        libdb2install.so.1 => /opt/ibm/db2/V9.5/lib64/libdb2install.so.1 (0x00002aaaadfeb000)
        libdb2locale.so.1 => /opt/ibm/db2/V9.5/lib64/libdb2locale.so.1 (0x00002aaaae1f6000)
        libdb2osse.so.1 => /opt/ibm/db2/V9.5/lib64/libdb2osse.so.1 (0x00002aaaae419000)
        libdb2osse_db2.so.1 => /opt/ibm/db2/V9.5/lib64/libdb2osse_db2.so.1 (0x00002aaaaea2d000)
        libdb2trcapi.so.1 => /opt/ibm/db2/V9.5/lib64/libdb2trcapi.so.1 (0x00002aaaaec73000)
        libstdc++.so.5 => /usr/lib64/libstdc++.so.5 (0x00002aaaaee87000)
        libgcc_s.so.1 => /lib64/libgcc_s.so.1 (0x00002aaaaf062000)
        /lib64/ld-linux-x86-64.so.2 (0x0000555555554000)
        librt.so.1 => /lib64/librt.so.1 (0x00002aaaaf170000)
In above listing, you see the location of all libdb* shared libraries pointing to the location of db2 installed on my system. On a machine, where there is no DB2 client, the location of libdb2* points to unknown. After you uncompressed ODBC-CLI driver, you will need to update LD_LIBRARY_PATH in your profile to the location of lib directory of clidriver.
export LD_LIBRARY_PATH=/home/vikram/clidriver/lib
Make changes to your php.ini file for entires as shown below:
ibm_db2.instance_name=db2inst1 or your DB2 instance name
[PHP_IBM_DB2]
extension=php_ibm_db2.dll or ibm_db2.so or any other name that you chose to compile the driver.
Make sure that you have made above changes in correct php.ini file. For example, the following image shows the location of my php.ini file and I should be making changes to this php.ini file. I write this because my system had many php.ini and I was making changes to the wrong php.ini and struggling to find why phpinfo() is not showing those changes.

-
If PHP is able to recognize ibm_db2 driver, you should be able to verify it by running phpinfo().
Make a simple PHP page with phpinfo() and assuming that you have already set apache web server and run it.phpinfp.php file ---------------- <? phpinfo(); ?>
-
Copy following PHP script in a file and test connection to DB2 by running it either through command line or through your web page.
db2conn.php
-----------
<?
  $database = 'SAMPLE';
  $user = 'db2admin';
  $password = 'password';
  $hostname = 'localhost';
  $port = 50000;
  $conn_string = "DRIVER={IBM DB2 ODBC DRIVER};DATABASE=$database;" .
  "HOSTNAME=$hostname;PORT=$port;PROTOCOL=TCPIP;UID=$user;PWD=$password;";
  $conn_resource = db2_connect($conn_string, '', '');
  if ($conn_resource) {
    echo 'Connection to database succeeded.';
    db2_close($conn_resource);
  } else {
    echo 'Connection to database failed.';
    echo 'SQLSTATE value: ' . db2_conn_error();
    echo 'with Message: ' . db2_conn_errormsg();
  }
?>

$ php db2conn.php
Connection to database succeeded.
If you notice above, we are making a direct connection to the DB2 database using server name, port number and by using the name of the database at the server. If we had a full DB2 client, we would have cataloged DB2 databases locally but we could not do that here since thin client does not come with DB2 CLP.
If you in fact had DB2 CLP (or fat client), you could have used following script that uses the database directory to resolve the local alias name of DB2. Please note that the following DB2 connection script will not work with thin ODBC-CLI driver as we are only specifying name of the database and no host name or port number. This is due to the fact that we catalog a remote DB2 database locally through a regular DB2 client and PHP driver will resolve host name or port number through DB2 database directory but that is not the case with the thin ODBC-CLI client. However, it is a best practice to use DB2 connection as shown in the above script since it will work for both thin and thick db2 clients. This may sound simple for the people who know about DB2 but I find people struggling on this topic very much.<?php $db_name = 'SAMPLE'; $usr_name = 'db2inst1'; $password = 'password'; // For persistent connection change db2_connect to db2_pconnect $conn_resource = db2_connect($db_name, $usr_name, $password); if ($conn_resource) { echo 'Connection to database succeeded.'; db2_close($conn_resource); } else { echo 'Connection to database failed.'; echo 'SQLSTATE value: ' . db2_conn_error(); echo 'with Message: ' . db2_conn_errormsg(); } ?> -
If you do not succeed in connecting to DB2, make sure that you have set following on your DB2 server.
$ db2 get dbm cfg | grep -i svce
 TCP/IP Service name                          (SVCENAME) =
If SVCENAME is not set, update this parameter to a TCPIP port number
$ db2 update dbm cfg using svcename 50000
$ db2set -all
If db2set -all does not show any variable as DB2COMM, set this to TCPIP
$ db2set DB2COMM=TCPIP
$ db2stop force
$ db2start
After making above changes, try again.